
Google AdMob is the best way to monetize mobile app with in-app advertising. When you plan to generate revenue from your free Apps then AdMob is the efficient mobile advertising platform.


https://github.com/JayaprakashR-Zealot/Knowledge-Circle---Android/tree/master/GoogleADs
Types of ADs
- Banner Ads - Occupies at the bottom of the screen.
- Interstitial ad - Block App UI and shows full screen at top of App UI.
- Native Ads - Component-based ad format that enhances UI how AD design look like i.e header or listview also. Maximize the amount of freedom to developers.
Creating AD units


- Sign into your AdMob account.
- Click Monitize tab & enter App name if New App then choose platform.
- Select Ad format & generate ad unit.
Adding Google AdMob to App
Step 1: Open build.gradle add play services library
compile 'com.google.android.gms:play-services:7.5.0'
Step 2: Add unit id in string file<string name="banner_ad_unit_id">ca-app-pub-3940256099942544/6300978111</string> <string name="interstitial_ad_unit_id">ca-app-pub-3940256099942544/1033173712</string>
Step 3: Add internet & network state permission, google play services version meta-data, and Add the AdActivity adding configChanges and theme attributes.
<manifest xmlns:android="http://schemas.android.com/apk/res/android"
package="com.truedreamz.googleads" >
<uses-permission android:name="android.permission.INTERNET"/>
<uses-permission android:name="android.permission.ACCESS_NETWORK_STATE"/>
<uses-permission android:name="android.permission.READ_PHONE_STATE"/>
<application
android:allowBackup="true"
android:icon="@mipmap/ic_launcher"
android:label="@string/app_name"
android:theme="@style/AppTheme" >
<meta-data android:name="com.google.android.gms.version"
android:value="@integer/google_play_services_version" />
<activity
android:name=".GoogleADsListActivity"
android:label="@string/app_name" >
<intent-filter>
<action android:name="android.intent.action.MAIN" />
<category android:name="android.intent.category.LAUNCHER" />
</intent-filter>
</activity>
<activity android:name="com.google.android.gms.ads.AdActivity"
android:configChanges="keyboard|keyboardHidden|orientation|screenLayout
|uiMode|screenSize|smallestScreenSize"
android:theme="@android:style/Theme.Translucent" />
<activity android:name=".NativeADsActivity"/>
</application>
</manifest>
Adding Banner Ads
1. Need to add com.google.android.gms.ads.AdView to your layout
<com.google.android.gms.ads.AdView
    android:id="@+id/adView"
    android:layout_width="wrap_content"
    android:layout_height="wrap_content"
    android:layout_centerHorizontal="true"
    android:layout_alignParentBottom="true"
    ads:adSize="BANNER"
    ads:adUnitId="@string/banner_ad_unit_id">
</com.google.android.gms.ads.AdView>
2. Calling loadAd method in onCreate()// Banner ADAdView mAdView = (AdView) findViewById(R.id.adView); AdRequest adRequest = new AdRequest.Builder().build(); mAdView.loadAd(adRequest);

Adding Interstitial Ad (Fullscreen Ad)
We display these type of Ads When user redirect to next screen or next level of game. The user have option to tap on the add or close add to resume to app.
Step 1: Doesn’t require an AdView element to be added in the xml layout.
Step 2: Adding the ad programatically from the activity
Step 3: We can display Ad where ever we want to display such as opening new screen or button click// Prepare the Interstitial Adinterstitial = new InterstitialAd(GoogleADsListActivity.this); // Insert the Ad Unit IDinterstitial.setAdUnitId("ca-app-pub-3940256099942544/1033173712"); // Load ads into Interstitial Adsinterstitial.loadAd(adRequest); // Prepare an Interstitial Ad Listenerinterstitial.setAdListener(new AdListener() { public void onAdLoaded() { // Call displayInterstitial() function Log.d(TAG,"AD is loaded."); } });
// If Ads are loaded, show Interstitial else show nothing.if (interstitial.isLoaded()) {
    interstitial.show();
}

Adding Native Ad
We can customize native ads like install App and show App content functionalities. The ad presentation can be changed
without deploying new versions of an app to play store because the work of customizing the presentation happens on the server,
less mobile code is required to load and display ads.
Step 1: Creating Ad unit ID for Native AD into your AdMob account.
Step 2: Select ad format from sample template & modify the design in CSC where we can opt for App install or content or Video App install
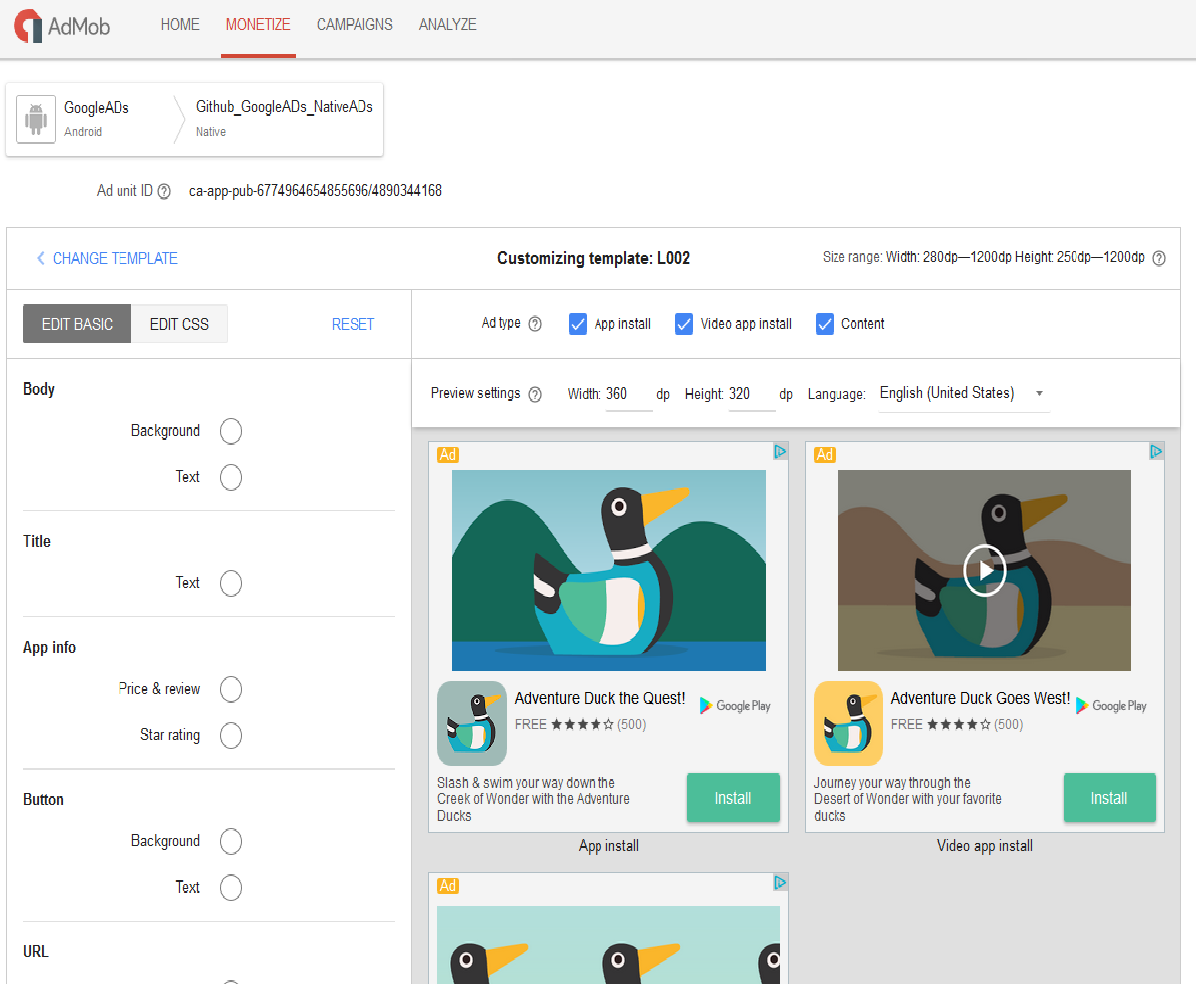
Step 3: Initialize the Mobile Ads SDK in onCreate().
Step 4: Assigning required UI element for NativeAppInstallAdView then set native add to view.MobileAds.initialize(this, "ca-app-pub-6774964654855696~6785879768");
Step 5: Loading UI element for populating content AD view.private void populateAppInstallAdView(NativeAppInstallAd nativeAppInstallAd, NativeAppInstallAdView adView) { adView.setHeadlineView(adView.findViewById(R.id.appinstall_headline)); adView.setImageView(adView.findViewById(R.id.appinstall_image)); adView.setBodyView(adView.findViewById(R.id.appinstall_body)); adView.setCallToActionView(adView.findViewById(R.id.appinstall_call_to_action)); adView.setIconView(adView.findViewById(R.id.appinstall_app_icon)); adView.setPriceView(adView.findViewById(R.id.appinstall_price)); adView.setStarRatingView(adView.findViewById(R.id.appinstall_stars)); adView.setStoreView(adView.findViewById(R.id.appinstall_store)); // Some assets are guaranteed to be in every NativeAppInstallAd. ((TextView) adView.getHeadlineView()).setText(nativeAppInstallAd.getHeadline()); ((TextView) adView.getBodyView()).setText(nativeAppInstallAd.getBody()); ((Button) adView.getCallToActionView()).setText(nativeAppInstallAd.getCallToAction()); ((ImageView) adView.getIconView()).setImageDrawable(nativeAppInstallAd.getIcon() .getDrawable()); List<NativeAd.Image> images = nativeAppInstallAd.getImages(); if (images.size() > 0) { ((ImageView) adView.getImageView()).setImageDrawable(images.get(0).getDrawable()); } // Some aren't guaranteed, however, and should be checked. if (nativeAppInstallAd.getPrice() == null) { adView.getPriceView().setVisibility(View.INVISIBLE); } else { adView.getPriceView().setVisibility(View.VISIBLE); ((TextView) adView.getPriceView()).setText(nativeAppInstallAd.getPrice()); } if (nativeAppInstallAd.getStore() == null) { adView.getStoreView().setVisibility(View.INVISIBLE); } else { adView.getStoreView().setVisibility(View.VISIBLE); ((TextView) adView.getStoreView()).setText(nativeAppInstallAd.getStore()); } if (nativeAppInstallAd.getStarRating() == null) { adView.getStarRatingView().setVisibility(View.INVISIBLE); } else { ((RatingBar) adView.getStarRatingView()) .setRating(nativeAppInstallAd.getStarRating().floatValue()); adView.getStarRatingView().setVisibility(View.VISIBLE); } // Assign native ad object to the native view. adView.setNativeAd(nativeAppInstallAd); }
Step 6: Based on user checks the option we create native ad request to load Native ADs.private void populateContentAdView(NativeContentAd nativeContentAd, NativeContentAdView adView) { adView.setHeadlineView(adView.findViewById(R.id.contentad_headline)); adView.setImageView(adView.findViewById(R.id.contentad_image)); adView.setBodyView(adView.findViewById(R.id.contentad_body)); adView.setCallToActionView(adView.findViewById(R.id.contentad_call_to_action)); adView.setLogoView(adView.findViewById(R.id.contentad_logo)); adView.setAdvertiserView(adView.findViewById(R.id.contentad_advertiser)); // Some assets are guaranteed to be in every NativeContentAd. ((TextView) adView.getHeadlineView()).setText(nativeContentAd.getHeadline()); ((TextView) adView.getBodyView()).setText(nativeContentAd.getBody()); ((TextView) adView.getCallToActionView()).setText(nativeContentAd.getCallToAction()); ((TextView) adView.getAdvertiserView()).setText(nativeContentAd.getAdvertiser()); List<NativeAd.Image> images = nativeContentAd.getImages(); if (images.size() > 0) { ((ImageView) adView.getImageView()).setImageDrawable(images.get(0).getDrawable()); } // Some aren't guaranteed, however, and should be checked. NativeAd.Image logoImage = nativeContentAd.getLogo(); if (logoImage == null) { adView.getLogoView().setVisibility(View.INVISIBLE); } else { ((ImageView) adView.getLogoView()).setImageDrawable(logoImage.getDrawable()); adView.getLogoView().setVisibility(View.VISIBLE); } // Assign native ad object to the native view. adView.setNativeAd(nativeContentAd); }
AdLoader.Builder builder = new AdLoader.Builder(this, ADMOB_AD_UNIT_ID);
if (requestAppInstallAds) {
    builder.forAppInstallAd(new NativeAppInstallAd.OnAppInstallAdLoadedListener() {
        @Override        public void onAppInstallAdLoaded(NativeAppInstallAd ad) {
            FrameLayout frameLayout =
                    (FrameLayout) findViewById(R.id.fl_adplaceholder);
            NativeAppInstallAdView adView = (NativeAppInstallAdView) getLayoutInflater()
                    .inflate(R.layout.ad_app_install, null);
            populateAppInstallAdView(ad, adView);
            frameLayout.removeAllViews();
            frameLayout.addView(adView);
        }
    });
}

if (requestContentAds) {
    builder.forContentAd(new NativeContentAd.OnContentAdLoadedListener() {
        @Override        public void onContentAdLoaded(NativeContentAd ad) {
            FrameLayout frameLayout =
                    (FrameLayout) findViewById(R.id.fl_adplaceholder);
            NativeContentAdView adView = (NativeContentAdView) getLayoutInflater()
                    .inflate(R.layout.ad_content, null);
            populateContentAdView(ad, adView);
            frameLayout.removeAllViews();
            frameLayout.addView(adView);
        }
    });
}

AdLoader adLoader = builder.withAdListener(new AdListener() {
    @Override    public void onAdFailedToLoad(int errorCode) {
        Toast.makeText(NativeADsActivity.this, "Failed to load native ad: "                + errorCode, Toast.LENGTH_SHORT).show();
    }
}).build();
adLoader.loadAd(adRequestNative);
Ad listeners are very useful to perform the next action when ad is
closed. Below are the ad listeners can be used to notify your app when
ad changes its state.
Testing ADs in devices
As per AdMob Policies
you are not allowed to click on your own live ads. In order to protect
your AdMob account from getting suspended, use test ads during
development as you might click the ads accidentally. When you run the project in Android studio, you can find the below line to enable ADs populating in device.
Use AdRequest.Builder.addTestDevice("486F6EB7B04F899EEE00BCB2F18B9031") to get test ads on this device.
I have uploaded the full source code in GitHub,
AdRequest adRequestNative = new AdRequest.Builder()
        // ************ IMPORTANT : Get test device id from Logcat*****************        .addTestDevice("486F6EB7B04F899EEE00BCB2F18B9031")
        .build();
https://github.com/JayaprakashR-Zealot/Knowledge-Circle---Android/tree/master/GoogleADs
Kindly raise your queries in the command section.
Happy Coding!!!
Cheers!!!
No comments:
Post a Comment