--

Showing posts with label AndroidAppDevelopment. Show all posts

Sunday, 7 October 2018

Chapter 0 : Modern Android Architecture ‘Android Jetpack’ - Lifecycle


       Jetpack is “the next generation of components to accelerate app development”. It’s a set of libraries, tools and architectural guidelines to help making building great Android apps quick and easy. It provides common infrastructure code so you can focus on what makes your app unique.


Activity/Fragment - Depend only on a view model.
View model - Provides the data for fragment or activity, and contains data-handling business logic to communicate with the model.
Repository - Depends on a persistent data model and a remote backend data source and handle data operations.
Room - An object-mapping library that provides local data persistence with minimal boilerplate code.
Retrofit library - To access our backend through REST API.

Lifecycle-manageable components such as activities and fragments perform actions in response to a change in another Android component. The lifecycle methods of activities and fragments leads to a poor organization of the code and to the proliferation of errors in most of the cases.
The lifecycle-aware component helps to move the code of dependent components out of the lifecycle methods of activity & fragments and into the components themselves.

Dependencies


AndroidX

dependencies {
def lifecycle_version = "2.0.0"
// Lifecycles only (no ViewModel or LiveData)
implementation "androidx.lifecycle:lifecycle-runtime:$lifecycle_version"
annotationProcessor "androidx.lifecycle:lifecycle-compiler:$lifecycle_version" // use kapt for Kotlin
// alternately - if using Java8, use the following instead of lifecycle-compiler
implementation "androidx.lifecycle:lifecycle-common-java8:$lifecycle_version"
}


Pre-AndroidX

dependencies {
def lifecycle_version = "1.1.1"
// Lifecycles only (no ViewModel or LiveData)
implementation "android.arch.lifecycle:runtime:$lifecycle_version"
annotationProcessor "android.arch.lifecycle:compiler:$lifecycle_version" // use kapt for Kotlin
// alternately - if using Java8, use the following instead of compiler
implementation "android.arch.lifecycle:common-java8:$lifecycle_version"
}


Refer here for updated Dependencies.

The android.arch.lifecycle package can automatically adjust their behavior based on the current lifecycle state of an activity or fragment that has three main classes that we’ll deal with:
  • LifeCycle
  • LifeCycleOwner
  • LifeCycleObserver

Lifecycle


Lifecycle class holds the information about the component (like an activity or a fragment) lifecycle state where allows other objects to observe this state.

The lifecycle events (i.e. Lifecycle.Event.ON_CREATE, Lifecycle.Event.ON_RESUME, Lifecycle.Event.ON_PAUSE and etc) & lifecycle states (INITIALIZED, CREATED, RESUMED and etc) are used to track the lifecycle status for its associated component.


A single state can span multiple lifecycle owner events, so for an activity it’s considered in the CREATED state once it’s created and just before it’s paused, and in the same time the duration between the activity’s onStart() and just before onPause() it’s considered also in the STARTED state.
Since multiple states can interleave for a given point of time, if we want to check for a specific state, we always use the isAtLeast method:

if (lifeCycle.currentState.isAtLeast(Lifecycle.State.STARTED)) { //...}

LifecycleOwner and Lifecycle Observers


If we're trying to manage the lifecycle of activity or Fragment, we must implement LifecycleOwner interface to the activity. The lifecycle of a whole application process is managed by ProcessLifecycleOwner. Fragments and Activities in Support Library 26.1.0 and later already implement the LifecycleOwner interface.

If we have a custom class that we would like to make a LifecycleOwner, we can use the LifecycleRegistry class, but we need to forward events into that class.

LifecycleOwners such as Activity & Fragments are objects with lifecycle like Activity and Fragments. LifecycleObserver (e.g. LiveData) observes LifecycleOwners and are notified of lifecycle changes.

class SampleObserver implements LifecycleObserver{

@OnLifecycleEvent(ON_CREATE)
void startUp(LifecycleOwner source) {
}

@OnLifecycleEvent(ON_ANY)
void onAny(LifecycleOwner source, Event event) {
}

@OnLifecycleEvent(ON_STOP)
void cleanUp(LifecycleOwner source) {
}
}


The best way to handle lifecycle-aware components (activities and fragments) as lean as possible. They should not try to acquire their own data; instead, use a ViewModel to do that, and observe a LiveData object to reflect the changes back to the views.
So, Android Lifecycle-aware components are tracked and managed by Room, LiveData and ViewModel in the next episode.

Thursday, 27 September 2018

Part 2 : Using SonarCloud with Travis CI auto build trigger


If you go through previous section 
Part 1: Travis CI introduction that would be helpful to follow my steps from this article.


Step 1 : Creating a user authentication token for your account on SonarCloud

     If we want to enforce security by not providing credentials of a real SonarCloud user to run your code scan, we have to provide a User Token as a replacement of the user login. This will increase the security of your installation by not letting your analysis user's password going through your network.


Step 2 : Encrypting generated Sonar token


      The easiest way to encrypt Sonar token with the public key is to use Travis CLI. This tool is written in Ruby and published as a gem. Please follow the link Install gem

Note : I suggest to use mac system to install gem if possible that would be easy to install & generate key.

travis encrypt SONAR_TOKEN

The above command generates encrypted Sonar token to use in travis.yml file

Step 3: Get SonarCloud.io Organization 


you want to push your project on and get its key


Step 4 : 


We have to create a sonar-project.properties file to the root folder of Android application.

sonar.projectKey=Same project key from the SonarCloud project

sonar.projectVersion=1.0

sonar.host.url=https://sonarcloud.io

sonar.organization=organization key from SonarCloud

sonar.projectName=Same project name from the SonarCloud project

sonar.login= SonarCloud Username

sonar.password= SonarCloud Password

# =====================================================
# Meta-data for the project
# =====================================================
sonar.sourceEncoding=UTF-8

sonar.sources=src/main/java

sonar.java.binaries=build

sonar.binaries=build

sonar.language=java

sonar.profile=Android Lint


Step 5: 

Add the following lines to your .travis.yml file to trigger the analysis.


Whenever user pushed to the specified branch in yml file, the sonar analysis triggers & generates measure data in “https://sonarcloud.io/


Please feel free to share your queries.

Happy coding !!!

Tuesday, 4 September 2018

Part 1 - Integrating Travis CI with Android app


Why Continuous Integration (CI)?


CI is the practice of merging in small code changes frequently instead of merging large change at the end of a development cycle. The goal is to build healthier software without last minute surprises. Travis CI helps us out from this issue.

Travis CI automatically builds and tests code changes, then provides immediate feedback on the success of the change and failure case also. Travis CI can also automate other parts of your development process by managing deployments (i.e. uploading to Testfairy) and notifications (i.e. sending a message to slack).

How Travis works?


When you run a build, Travis CI clones our GitHub repository into a brand new virtual environment and carries out a series of tasks to build and test your code. If one or more of those tasks fails, the build is considered broken. If none of the tasks fail, the build is considered passed, and then Travis CI can deploy your code to a web server, or application host.

This service is free for open source projects and so easy to use that you will wonder why didn’t you use it before.


Are you ready to kick-start Travis CI?

To start using Travis CI, make sure you have:
  • A GitHub account.
  • Owner permissions for a project hosted on GitHub.

  1. Go to Travis-ci.com and Sign up with GitHub.
  2. Accept the Authorization of Travis CI. You’ll be redirected to GitHub.
  3. Click the green Activate button, and select the repositories you want to use with Travis CI.
  4. Add a .travis.yml file to your repository to tell Travis CI what to do. The following example specifies Android project that should be built with jdk and the latest versions of JDK 8.
  5. Add the .travis.yml file to git, commit and push, to trigger a Travis CI build.
    Note: Travis only runs builds on the commits you push after you’ve added a .travis.yml file.
  6. Check the build status page to see if your build passes or fails, according to the return status of the build command by visiting the Travis CI and selecting your repository.


Enabling continuous integration on GitHub


  1. Once you have your repository created on GitHub click on Settings and Integrations & services. 
  2. From the Add service drop-down menu choose “Travis CI” then “Add service”.
  3. Navigate to https://travis-ci.org/profile and click on the switch next to the repository that you’d like the Travis builds to be run with.
Note: once you’ve switched on Travis builds on your repository a build will be triggered every a commit or a pull request is made. Without a .travis.yml file the build will fail. Configuring the .travis.yml will be done on the next step.


Setting up Travis builds

You need to add a .travis.yml file into the root of your project. This file will tell how Travis handles the builds.

At the beginning of your .yml file add the following parameters:

language: androidsudo: requiredjdk: oraclejdk8

sudo requirement is added because a license needs to be manually added later.

Specify the variables that are going to be used in the build. Set the ANDROID_BUILD_TOOLS and ANDROID_API to the same as specified in your projects build.gradle file.

env:global:- ANDROID_API=24- EMULATOR_API=21- ANDROID_BUILD_TOOLS=24.0.2- ADB_INSTALL_TIMEOUT=5 # minutes


Components 


The exact component names must be specified (filter aliases like the add-on or extra are also accepted). To get a list of available exact component names and descriptions run the command SDK manager --list.


android:components:- tools- platform-tools- build-tools-$ANDROID_BUILD_TOOLS- android-$ANDROID_API- android-$EMULATOR_API_LEVEL- extra-google-m2repository- extra-android-m2repository # for design library- addon-google_apis-google-19 # google play services- sys-img-armeabi-v7a-addon-google_apis-google-$ANDROID_API_LEVEL- sys-img-armeabi-v7a-addon-google_apis-google-$EMULATOR_API_LEVEL
licenses:- android-sdk-preview-license-.+- android-sdk-license-.+- google-gdk-license-.+


Before install part,

before_install:- mkdir "$ANDROID_HOME/licenses" || true- echo -e "\n8933bad161af4178b1185d1a37fbf41ea5269c55" >
"$ANDROID_HOME/licenses/android-sdk-license"- echo -e "\n84831b9409646a918e30573bab4c9c91346d8abd" > "$ANDROID_HOME/licenses/android-sdk-preview-license"- chmod +x gradlew- ./gradlew dependencies || true


The — ./gradlew dependencies || true is required if you get an error please install missing components using the SDK manager.

Script


- ./gradlew clean assembleAndroidAppRelease

The Gradle wrapper executes mentioned project at release build variant. If you intend to use Google Play Services with Travis, make sure you also use the Maven support library.

you will need to make sure to include the Maven repo in your root build.gradle file:

repositories {maven {url 'https://maven.google.com'}}


Setting up automatic builds


Travis can upload your project builds directly to other providers such as TestFairy. To be able to install a .apk file on an Android device the file needs to be signed.

Once the keystore file is created, place it in your project root. You’ll want to encrypt the file which is done with the Travis command-line command:

travis encrypt-file keystore.jks

After encrypting the file copy the generated script to the before_install section.Running the command will leave the old keystore file in place and will also generate a keystore.jks.enc file. Remove the original keystore file from the project and keep the encrypted one.

The keystore password and key password need to be added to the .travis.yml file, as they will be used in the .apk signing process. The passwords need to be encrypted though.


Copy the generated values to your .travis.yml in the environmental variables section (env). Do the same for both the keystore password and the key password.

The setup for the deployment is done in the before_deploy section of the .yml file. Here the jarsigner is used to sign the file with the keystore file provided, as well as to verify it.


before_deploy


- cp $TRAVIS_BUILD_DIR/.keystore $HOME- cd app/build/outputs/apk/- jarsigner -verbose -sigalg SHA1withRSA -digestalg SHA1 -keystore $HOME/keystore.jks -storepass $storepass -keypass $keypass app-release-unsigned.apk yourapp_keystore
# Verification- jarsigner -verify app-release-unsigned.apk- "${ANDROID_HOME}/build-tools/24.0.2/zipalign -v 4 app-release-unsigned.apk yourapp.apk"

Next, it’s necessary to set up the deploy section of the .travis

deploy:provider: releasesfile: yourapp.apkskip_cleanup: trueon:repo: githubUsername/Repositorytags: truejdk: oraclejdk8api_key:secure: here goes the encrypted api key

You can generate the API key by going to your account settings on GitHub, Personal access tokens, Generate new token. Set the scope to public_repo and generate the token. Remember to copy the access token.


Encrypt the API key and add it to the deploy section under api_key. Remember to check the Travis WebLint before committing your changes.
When a commit is tagged the Travis deployment will be triggered.

Wednesday, 11 July 2018

Part 1 - Monitoring code quality of your Android application with SonarQube

Why SonarQube?


SonarQube (i.e. SonarQube.org) is a powerful tool to monitor and analyze code quality, security and reliability. It is a continuous inspection engine and offers reports on duplicated code, exception handling, coding standards, code smells, unit tests, code coverage, code complexity, potential bugs, comments, design, and architecture etc.

SonarQube supports 20+ programming languages. Plugins for some languages (Java, JavaScript, Kotlin, Objective-C, PL/SQL, PHP, and Python) are bundled with the platform. To analyze a different language, we can install the plugin. As Android projects are based on Java sources, it is possible to analyze such projects with SonarQube.

The usage of SonarQube is limited to a local instance (i.e. Running Sonar in local machine). Doing the same against a remote server (i.e. Sonarcloud, centralized sonar) shouldn’t be a problem once you have understood the basics.

Installing SonarQube to a local machine


1. Go to https://www.sonarqube.org/downloads/ and download the latest version of Sonarqube by clicking on Download Latest.
2. Unzip the downloaded archive.
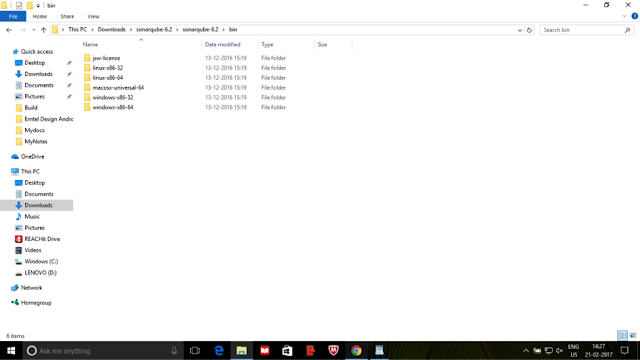
3. Go to sonarqube-/bin folder. You will see different folders based on platforms.


4. Open the corresponding folder according to your platform. There you should see a batch file named StartSonar for windows (or sonar.sh for other platforms)
5. Double click on StartSonar batch file. This will open a sonarqube console. Wait for the execution to complete and then you will see the message ‘Process[ce] is up’ and ‘SonarQube is up’.
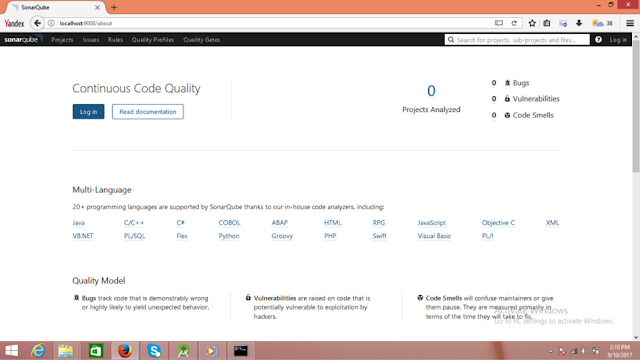
6.Open localhost:9000 on a browser. You will see Sonarqube web page.


Adding Sonarqube configuration in gradle

1. Add sonarqube plugin to for project level Gradle file (i.e. build.gradle of root folder) of your project.

            dependencies {
               classpath "org.sonarsource.scanner.gradle:sonarqube-gradle-plugin:2.6.2"
            }

2. Add sonarqube plugin to for app module Gradle file of your project.

          apply plugin: 'org.sonarqube'
          apply from: '../sonarqube.gradle'


3. By adding sonar configuration to separate Gradle file ‘sonarqube.gradle’

// recommend specifying the flavor once and dynamically adapt paths to it
def flavor = "Project flavor"
sonarqube {
properties {

def libraries = project.android.sdkDirectory.getPath() + "/platforms/android-22/android.jar" 

property "sonar.host.url", "http://localhost:9000"
property "sonar.projectKey", "package of Android app"
property "sonar.projectName", "Name of project"
property "sonar.projectVersion", “Project version”

property "sonar.sourceEncoding", "UTF-8"
// first defines where the java files are, the second where the xml files are
property "sonar.sources", "src/main/java,src/main/res"
property "sonar.binaries", "build/intermediates/classes/${flavor}/debug"
property "sonar.libraries", libraries
}
}

sonar.projectKey - Contain any unique key name (i.e. Package name of Android App) for your project. It should be different for every project you are analyzing with Sonarqube. 

sonar.sources - Contain the path of java files and xml layout files.

sonar.exclusions - Used to exclude directory/files from being analyzed by Sonarqube.


4. After building or syncing project, open Command Prompt and navigate to app module directory of your project where your Gradle file is located. Execute gradle sonarqube and wait until the build is completed.
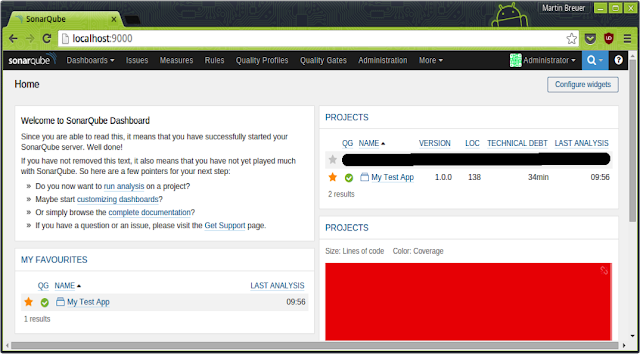
5. Refresh or open localhost:9000 web page on the browser. You will see your project added.

Understanding Sonarqube analysis


At the top right of the web page, you will see a login option. You can log in as an administrator by using both username and password as admin.
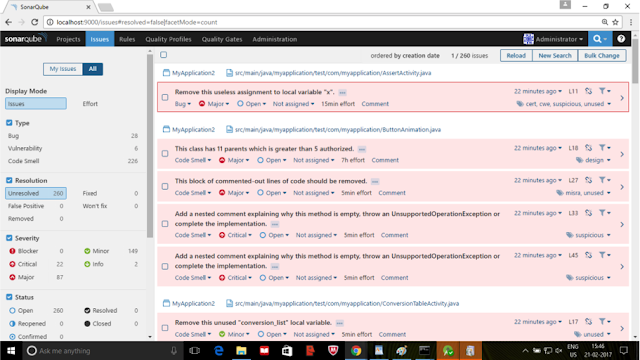
On Home page you will see the count for the number of projects being added to sonarqube and number of bugs, Vulnerabilities and Code Smells.

Bugs

Bugs track code that is demonstrably wrong or highly likely to yield unexpected behavior.

Vulnerabilities

Vulnerabilities are raised on code that is potentially vulnerable to exploitation by hackers.

Code Smells

Code Smells will confuse maintainers or give them pause. They are measured primarily in terms of the time they will take to fix.

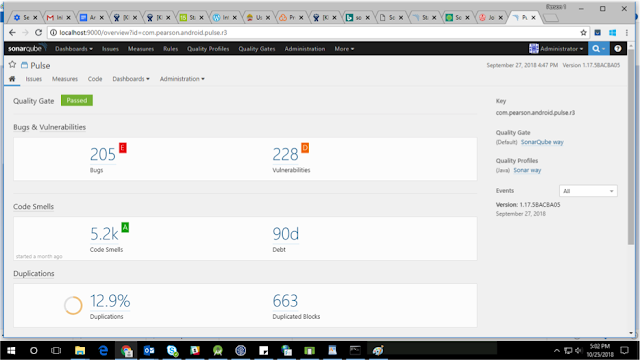
When you will navigate to Projects tab you will see projects being rated from A to E on the basis of Reliability, Security and Maintainability where A being best and E being the worst. Also, you will see the percentage of duplications in the code and the size of the code in terms of a number of lines of code.


Quality Gate

Quality Gate is the set of conditions the project must meet before it can be released into production. You can see whether your project is passed or failed in terms of Quality Gate.


Rules

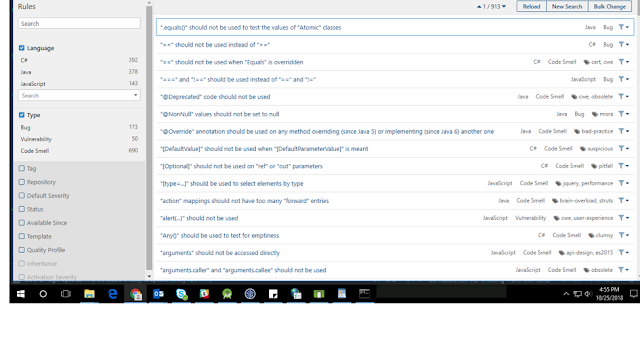
Sonar has a set of rules to validate source code standard of the Android application. When you will navigate to Rules tab, you will see the list of rules on the basis of which inspection is done. In the left panel, you can apply various filters to list rules on the basis of language, type, tags etc.


Issues

When you will navigate to Issues tab, you will see a list of various issues your projects has. When you will select Effort in Display Mode you will see estimated time required to handle these issues.


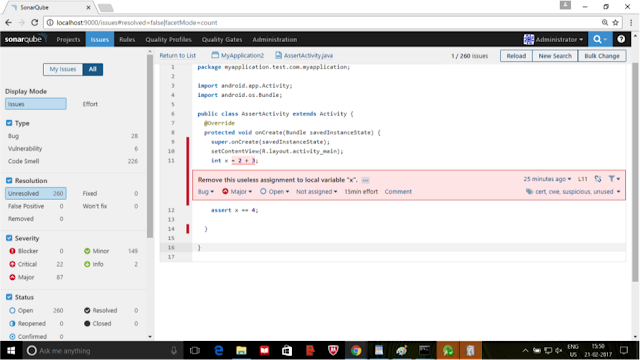
Clicking on the arrow at the right end of an issue will take you to the line in your code where the issue is found.


Administration


Administration tab section allows you to edit global settings for this SonarQube instance.
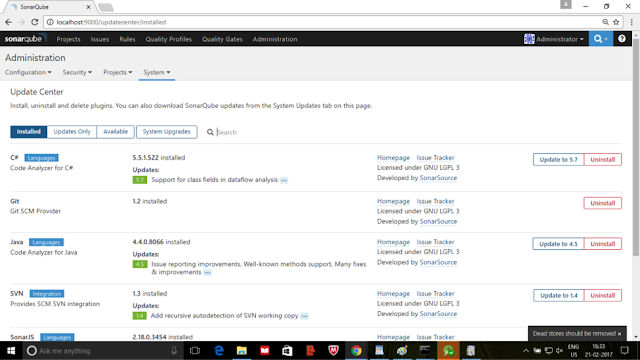
In the Administration section, click on the System tab and go to the Update Center. Here you can install various plugins.

In the Installed section you will see plugins which are already installed. In Updates Only section you will see updates for various installed plugins.

In the Available Section, you will see various plugins which are available to install.You can install plugins for various languages which you want to support.Also there are plugins for various external analyzers like FindBugs which provide Findbugs rules for analysis of Java projects.


Please feel free to post any queries, doubts or suggestions in the comments section.


References

https://medium.com/@sandeeptengale/integrate-sonarqube-for-android-application-development-8e40ec28e343
https://androidlearnersite.wordpress.com/2017/02/21/integrating-and-understanding-sonarqube-in-android/
https://room-15.github.io/blog/2016/01/21/Static-code-quality-measurements-with-SonarQube-Jacoco-and-UnitTests/
https://sogilis.com/blog/sonarqube-android-projects/

Wednesday, 13 June 2018

Kotlin - Chapter 5 - Model View Presenter (MVP) pattern

The Model View Presenter pattern is an architectural pattern based on the Model View Controller (MVC) pattern that increases the separation of concerns and facilitates unit testing.
It creates three layers, Model, View, and Presenter, each with a well defined responsibility. The MVP pattern separates the data model, from a view through a presenter.

The Model
Accommodating models (POJO class), data from various sources (database, server results, cache, Android file system, etc.).

The View
View is responsible for visual display of applications, along with data input by users. This part should NOT under any circumstances process the data. Its function is only to detect the input (e.g. touch or swipe) and visualization.

The Presenter
Presenter is responsible for passing of data between two layers, and thus the analysis and interaction. Such division allows substitution of code parts, proper testing and connects layers as interfaces.

Android MVP Guidelines
  1. Activity, Fragment and a CustomView act as the View part of the application.
  2. The Presenter is responsible for listening to user interactions (on the View) and model updates (database, APIs) as well as updating the Model and the View.
  3. Generally, a View and Presenter are in a one to one relationship. One Presenter class manages one View at a time.
  4. Interfaces need to be defined and implemented to communicate between View-Presenter and Presenter-Model.
  5. The Presenter is responsible for handling all the background tasks. Android SDK classes must be avoided in the presenter classes.
  6. The View and Model classes can’t have a reference of one another.
Having covered the theory of MVP architecture, let’s build an android MVP app now. I have developed a very simple application to demonstrate MVP. When user click ‘Tap me’ button, I am showing “Hello, Kotlinzers!!!”  popup message,

We have to create 3 packages such as model, presenter, view.

When to follow MVP design pattern ?
MVP makes it easier to test your presenter logic and to replace dependencies. But using MVP also comes with a cost, it makes your application code longer. Also as the standard Android templates at the moment do not use this approach, not every Android developer will find this code structure easy to understand.
Model Layer
The Model layer is responsible for handling the business logic. It holds an popup message shown to the user, and a reference to the Presenter.

      We have to create IBaseView.kt & IBasePresenter.kt interfaces to implement to communicate between View-Presenter and Presenter-Model.

interface IBasePresenter {
fun clickMe()
}


interface IBaseView {
fun clickSuccess(text: String)
}

Let us implement IBaseView interface in Activity,

        Because Android doesn't permit the instantiation of an Activity, the View layer will be instantiated for us. We are responsible for instantiating the Presenter and Model layers. Unfortunately, instantiating those layers outside the Activity can be problematic.
       It is recommended to use a form of dependency injection to accomplish this. Since our goal is to concentrate on the MVP implementation, we will take an easier approach. This isn't the best approach available, but it is the easiest to understand.
I have shared this source code on GitHub

Happy Coding!!!

Thursday, 24 May 2018

Kotlin - Chapter 4 - Room DataBase framework

Saving data in local DB using Room

Room persistence library introduced at Google I/O 2017 basically is not a database it just acts as middle man between SQLite and Application layer. By caching required pieces of data from web services.
If the device cannot access the network, the user can still access that content while they are offline. Any user-initiated content changes are then synced to the server after the device is back online.
Room provides enhanced security, easy access, easy to setup and quick to get started with new database. All the DML (Data Manipulation Language) commands are now annotated except SELECT command which works with @Query.

Components of Room


We have 3 components they are
Entity : a model class annotated with @Entity where all the variable will become column name for the table and name of the model class becomes name of the table.
Database: This is an abstract class where you define all the entities that means all the tables that you want to create for that database.
Dao (Data Access Objects): This is an interface which acts is an intermediary between the user and the database. All the operation to be performed on a table has to be defined here.
Apply the kotlin-kapt plugin in the app.gradle file,
apply plugin: 'com.android.application'
apply plugin: 'kotlin-android'
apply plugin: 'kotlin-android-extensions'
apply plugin: 'kotlin-kapt'
Add the kapt dependency in the app.gradle file,
dependencies {
   implementation fileTree(include: ['*.jar'], dir: 'libs')
   implementation "android.arch.persistence.room:runtime:$room_version"
   annotationProcessor "android.arch.persistence.room:compiler:$room_version"
   kapt "android.arch.persistence.room:compiler:$room_version"
...
}
       First of all let’s create our model class where all it’s variable name will become the column name and name of model class will become the table name.

      Now let’s create our Dao interface which contains the list of operation that we would like to perform on table.
Finally let’s create our database with version number.
@Database(entities = arrayOf(User::class), version = 1)
abstract class UserDatabase : RoomDatabase() {
abstract fun userDAOAccess(): IUserDao
}
We can insert test user to Room DB by calling insert() function,

       One great feature that Room supports is LiveData that means you can observe the changes and as soon as any data gets changed in the database you get the response. One more advantage is that LiveData observable are lifecycle aware component which gives response only when your activity or fragment is either in onStart or onResume state.
Now save and run the App. You can download the full source code for this project on GitHub
Happy coding !!!

Monday, 30 April 2018

Kotlin - Chapter 3 - Showcasing Viewpager using Kotlin


ViewPager in Android allows the user to flip left and right through pages of data. Screen slides are transitions between one entire screen to another and are common with UIs like setup wizards or slideshows.
This post shows you how to do screen slides with a ViewPager provided by the support library in Kotlin. ViewPagers can animate screen slides automatically.
You’ll divide the ViewPager implementation into three parts:
  1. Adding the ViewPager
  2. Creating an Adapter for the ViewPager
  3. Wiring up the ViewPager and the Adapter
We have to add android.support.design.widget.TabLayout & android.support.v4.view.ViewPager in layout file same as Java.


ViewPager is only available through the Android Support Library. The Android Support Library is actually a set of libraries that provide backward compatible implementations of widgets and other standard Android functionality.
These libraries provide a common API that often allow the use of newer Android SDK features on devices that only support lower API levels. You should familiarize yourself with the Support Library and Support Library Packages.
We need to create our PageAdapter. This is a class that inherits from the FragmentPageAdapater class. In creating this class, we have two goals in mind:
  1. Make sure the Adapter has our fragment list
  2. Make sure it gives the Activity the correct fragment
By extending FragmentPagerAdapter, we can add multiple fragments to the ViewPager. We need to implement setupViewPager method in the ViewPagerActivity.

supportFragmentManager is equivalent to the getSupportFragmentManager() method you would use in Java and viewPager.adapter = pagerAdapter is the same as viewPager.setAdapter(pagerAdapter).
Note : The FragmentPagerAdapter is the more general PageAdapter to use. This version does not destroy Fragments it has as long as the user can potentially go back to that Fragment. The idea is that this PageAdapter is used for mainly "static" or unchanging Fragments. If you have Fragments that are more dynamic and change frequently, you may want to look into the FragmentStatePagerAdapter. This Adapter is a bit more friendly to dynamic Fragments and doesn't consume nearly as much memory as the FragmentPagerAdapter.
The output must be,

FragmentPagerAdapter or FragmentStatePagerAdapter?
There are two types of standard PagerAdapters that manage the lifecycle of each fragment: FragmentPagerAdapter and FragmentStatePagerAdapter. Both of them work well with fragments, but they are better suited for different scenarios:
  1. The FragmentPagerAdapter stores the fragments in memory as long as the user can navigate between them. When a fragment is not visible, the PagerAdapter will detach it, but not destroy it, so the fragment instance remains alive in the FragmentManager. It will release it from memory only when the Activity shuts down. This can make the transition between pages fast and smooth, but it could cause memory issues in your app if you need many fragments.
  2. The FragmentStatePagerAdapter makes sure to destroy all the fragments the user does not see and only keep their saved states in the FragmentManager, hence the name. When the user navigates back to a fragment, it will restore it using the saved state. This PagerAdapter requires much less memory, but the process of switching between pages can be slower.

Now save and run the App. You can download the full source code for this project on GitHub

Happy Coding !!!